

Foam-smithing is completely new to me. I’ll be happy if I lose DragonMaster to a better artisan, but not if it is because I don’t compete in every category. Admittedly, I learned a lot about what judges look for when I was judging Olympiad, so I’ve got a leg up. I joined Plastidip Artists Facebook group, and started asking more questions.
I have a kitespar core we got at Known World War 1, when Deinol & I were advised by Sir Kupe. It is about 41 inches long so would fall in the Long Sword category. Deinol made one omni-sword, and my hubby bought two omni-swords, so a flat blade seemed reasonable to add to the family collection.
I have to admit that I NEVER plan to take the field with any of the field-legal items I make. I enjoy crafting on the sidelines too much. So while I may use my personal heraldry, others will fight with my equipment.
 The AmtWiki said metal was permissible in the handle area (as long as it was permanently attached) to help counterbalance the blade – a serious concern due to the length. So I took the core to the local hardware store, and found some 1/2-Inch Rubber Leg Tips
 for chair legs, that fit perfectly.
 Looking in the bolts, I found a 5/16-18 bolt 8″ long , with a hex head just larger than the end of the core. I asked Deinol to file off the points on the bolt, because the power is out to the garage where the right power tool is.
  I also got some silicone adhesive, to squirt into the core at the handle end, to firmly seat the bolt inside the core. The one I chose specifically said it worked with metal, plastic, and rubber and was permanently flexible.
I marked the outside of the core where the end of the bolt would land, so I know how at least how long I need to make my handle. Then squirted a LOT of the silicone inside the core – about half of the package. Inserted the rounded off bolt, then added a bit more silicone into the rubber tip, and firmly seated that on the core. I don’t believe that bolt is going anywhere. Then I let it dry. It did work to shift the balance toward the hilt. The other end got a rubber tip, and then both tips got reinforced with strapping tape. I used quite a bit more strapping tape on the weighted end, because I want to ensure safety.


I asked the fighters in my house for opinions on the handle length, so it could be used either two handed, or one-handed. They disagree somewhat, so I’m going to land somewhere in the middle.
 I had a stress ball, about 2.5″ diameter, that folks at the Centerpoint park thought would be a good pommel. So I cut and X shaped slit, using the scissors blade to cut it open about 40% through. About 1/4″ of the points of the X were removed, then shoved the handle end in by force. Added a sufficient amount of DAP contact cement into all the cracks and crevices, and let it dry. Then off shopping for more supplies. About 2 hours later, I got home, squeezed the slits shut, and then used 3 pieces of tape to make sure they stayed shut and attached to the handle.
 Next step is making the handle – I want the handle to be basically rectangular, and in line with the blade. I’m adding a narrow strip of puzzle mat on two sides, glued on with DAP. I marked out where the glue should go, then applied the contact cement to both the foam strip and the core, as well as a tiny bit of the stress ball pommel. Let dry, then attach together. I used a wrap of strapping tape every couple of inches, since I don’t have any clamps suitable for this strange shape.
 After getting both handle sides on, and wrapping it with thin self stick craft foam, I spent quite a bit of time on YouTube, thinking about hilt wrapping techniques. It might seem premature, but knowing how I’m going to finish can have an effect on how I get there. I believe that three strand ringbolt hitching, with the ridge of hitches on the blade side of the sword is my plan. Here’s a test of that design.
At this point, I’m torn. I have a LOT of puzzle mat, with the attendant puzzle edges. I could use that as part of my inner core on my blade, and it would be relatively sturdy. On the other hand, one commenter said puzzle mat swords are what you use to hit people you don’t like. I also have camp pad and thin self stick craft foam. Some of the puzzle mat I have is older, and I’ve used it camping. I think it is both slightly thicker and stiffer than the package I got cheap at Menards. The new puzzle mat is sort of wimpy, I’m thinking I will go with it for the inner core.
Another consideration is if I want any type of cross guard. I decided instead to make what would be more like a Japanese tsubo – just a rounded rectangle, slightly bigger than the final sword dimensions. I used three pieces of puzzle mat cut 4″ by 2.5″, with a small rectangular center opening, that I slipped over the thrusting tip cap. The pieces were DAPed while on the stick, and then rubber banded together as a clamping method. My plan was to use cloth ribbon or bias binding to wrap the guard, which would help keep it clamped together, as well as count for the fabric covered within 1/2 inch of the striking surface. But the piece I had, wasn’t long enough. I’ll have to buy several packages in matching colors.


 I used a tiny bit of epoxy to glue the three ends of paracord into a small recess in the foam of the handle, and also used a wood burner to lightly melt the three cords together. The hardness of the epoxy won’t be a problem, as the guard with eventually be seated over the end of the handle section.
 I’ve cut out the main three inner layers for the sword, including a cut out around the larger tip. The core is just slightly thicker than the puzzle mat, so I added a couple of stick on craft foam layers to get it close, and put a board on top to help keep everything together while the DAP dries. After a few weeks of contemplation, I suspect those craft foam layers might be a weak point.
Now, before I can glue the core into my U-shaped box, and add the other flat side, I have to get the guard into the proper position. And before I can do that, I need to do the hilt wrap, at least most of the way. (I’m going to PlastiDip the pommel, so won’t finish the last of the wrap until that is done.)
 The 3 strand ringbolt hitching turned out quite nicely, and used about 10-11 feet of paracord in each of the 3 colors. I tightened the hitching to slightly compress the underlying foam. Toward the pommel end, I wrapped the hitches even tighter. You would think that is a flaw, but instead is a feature. My husband is missing part of his fingers, and wanted a little bit smaller hilt handle, so he could grip well. I tried to make everyone happy, as his preference is a bit too small for me and the others in the family.
  Each end of the wrap will be done with a 7×4 Turk’s head knot, tied originally on the hand, then slid onto the hilt, then followed along for a second wrap, and then tightened up. (Which took under 4 feet of silver paracord for each end, so I was able to fully utilize the 18 foot length I purchased with little waste.)
 Got grosgrain ribbon 3/8″ wide, and used nearly an entire spool covering the guard, along with some Fabric Fusion to help secure the textile layers to each other. Not entirely sure that was the best choice. Bias tape very likely would have laid down smoother, because of the bias stretch, like you can see in the test photo above. But bias tape doesn’t come in long enough lengths. You can see some places were the ribbon doesn’t quite lay flat. I’m not happy with that. In fact, I hated in enough that I covered the grosgrain ribbon with black cloth athletic tape. It sticks up in a few places, but I’m hoping time and maybe a light touch of the iron will fix that.
 Guard slid down onto top of hilt, and a few small cubes of foam added to the open spaces, to help secure the core in the center of the guard. First Turk’s head knot wiggled up to sit right next to the guard. Now time to use the contact cement along the core, the built up u-shaped side, and the flat side that completes the box. Let try until tacky, and put it all together. I used some tape to also hold everything together while it dries overnight. Second Turk’s head knot started, and will be slipped over the pommel and then finished up.
Now time to build up the thrusting tip. I filled in some small gaps around the rubber core cap, and used 4 pieces of puzzle mat to make a rounded tip.


Now we start to get clever. I’m using 3 layers of camp pad for my striking surface. But I’m cutting it wider than the foam core so I can insert decorated sides. I also want to be sure that the foam isn’t fighting itself. I glued the 3 layers with DAP only along one side, just short of the tip, and NOT to the core. This was clamped down and allowed to dry. Next day I glued the remaining length, but made sure the curve over the tip was not compressed. That couldn’t exactly be clamped, but I let the heavy clamps weight it down. I used the foam core to help shape it, but again, the camp pad was not glued to the core yet.


 I was successful, and after drying, I had a “hairpin” shaped foam. I marked that with the area that would contact the foam core, and carefully applied glue to just that area along with the foam core. Then, starting at the tip, I matched them together and clamped them well. I’d measured a tiny bit off, so I had to add a little bit to fully fill the space between guard and camp pad blade on one side. Then, to smooth the sides of the striking surface, and to be really, really, too clever to fail twice clever, I glued the NON-sticky side of the thin foam to the sides of my camp pad, including the underside where the inset will sit. When I add the cloth cover, I will pull that paper off the sticky side, and it will help temporarily hold the cloth cover down while I glue it in the area below the inset.


 When I glued the striking surface down, I did NOT glue it to the black athletic tape covered guard. This is so I could use a cord attached to each end of my cloth covering strip (9″ x 66″) to get under the end of the striking surface, and tightly tie around the core. There was one cord at each end in the center of the fabric strip, about 2-3″ long, that was used to first pull the fabric under, and tie it tightly. The cords on each corner were to help pull the ends under, and instead of going around the opposite side of the core, they actually were crossed and pulled thigh on the same side of the core, then wend around the other side of the core and tied.
  The fabric is a heavy cotton twill, that has a bit of stretch. That enabled me to put a small bit of tension on the cloth as it travels around the hairpin. Another tiny refinement, possibly not necessary, was to stitch two lines of gathering stitches along each side, about 3 inches long, right where the cloth at the tip turns the corner from the blade sides to going behind the inset.
  By using gathering stitches, I have more control over how the fabric bunches in that spot. (I totally could have created a form fit cover, but I didn’t want seams at the edges of the blade, for durability reasons.) The sticky side of the foam will not hold the fabric when this is in use, but it doesn’t need to. It only has to hold the fabric long enough for the glue to set well behind the inset area. I used DAP on both the fabric edges, the flat center of the inset recess, and the vertical edges of the inset space. I wanted better adhesion on the vertical sides that the self stick foam would allow.
The insets along the side and the pommel are where I’m doing plastidip, and this design allows me to make multiple mistakes. I can discard any crappy versions, and only use the perfect last pair to glue into the sides. In theory, this could allow someone to make a bunch of flat blade sword blanks, and then allow final customization for the customer. That would allow economies of scale to combine with really awesome art.
 I’m lucky is that an escallop is one of the normal designs programmed into the Brother Scan & Cut, and it will cut the thin craft foam. My friend demonstrated how it worked, and provided me with a number of cut escallops for use in this and other projects. I used the wave shaped Frog Tape as a guide for the foam waves. I carefully applied my foam wave strips and escallops alternating.
I took the can plastidip, and poured into a new metal quart can, then filled the original can nearly but not quite half full with solvent. 2 parts dip to 1 part solvent would be 33%, and recommendations are for thinning the brush-on by 30 percent. This plan also has the benefit of helping rinse out the remaining plastidip from the original can.  I roughed the surface of the stress ball pommel with sandpaper just a touch. The inset pieces got multiple layers of thinned brush on plastidip, over the smoother side of the puzzle mat decorated with craft foam. The layers I brushed on with the foam brush were so thin I despaired of ever finishing. So I switched to a chip brush for a few layers, which allowed a thicker coat.
 Then I tried some spray plastidip, because many of the youtubers mix brush on and spray. OMG – that stuff stinks. I know that everyone talks about using a respirator, but then several of the videos didn’t have them using it. So I had no idea it would stink so terribly. (I didn’t feel like investing in an expensive respirator for my first test of such a small amount of material was necessary. If you are going to use ANY of the spray plastidip, it is absolutely necessary.) There was some of the ‘orange peel’ texture Sir Kupe warned me about. But I had to try it out. Now I know I hate the spray so much, I’m giving away my nearly full can.
That was such a horrible experience, I went back to another layer of brush on, this time with a foam brush again, because I was looking for a pretty thin coat.
 Although dipping is more likely to get a thicker, heavier, and less resilient pommel, considering the weight balance of this sword, I’m ok with heavier. I’m not going to be punching with this pommel, so the flexibility is less crucial. And most important, I want to see how the dip works and dries, in comparison to the brush-on, and when my thinned can was fresh and full was the best time. The dip worked great, except it wouldn’t stick to the strapping tape well. Tutorials told me that, but I had to see how badly it stuck or didn’t. The foam cutout I’d stuck to the bottom, where 3 strands of strapping tape crossed, didn’t stay attached, but peeled up from the strapping tape after the first dip coat. I took it off, gave the pommel a second dip coat, and decided to cover the pommel with fabric. T-shirt fabric will work without having as much bulk where it gathers at the hilt. After creating a drawstring, the cover needs to tie across the 7″ circumference of the pommel. I ran one end of the drawstring cord back to the opposite side of the circle, to have more even pull on the bag created. The raw edges will be on the inside, and the drawstring cord for the fabric circle will be run under the handle cording, and covered by the turk’s head knot.


 I then used spray paint to add several thin coats of white paint over all my inset strips. The can said to either add the next coat within 1 hours, or after 48. Well, I didn’t have 48 hrs left, so I tried to add the FrogTape wave masking and paint with blue. But the tape pulled and made a weird texture on the small bit it touched. Oops. New plan, I painted the blue areas by hand. This actually ended up giving the sword its name, for as I worked, layering slightly different colors, and depending on the brush strokes, I created wild waves. Even the “white” parts got a very light blue basecoat, and some wave tips. The recesses of the escallop got a tan color, and a slightly off white for the shells. The super smooth texture of the white paint (which I did succeed at, so yay, me) looked unnatural – escallops always have lines, so I tried to replicate that. Next to last step was some clear coat.
The final step for the insets is to DAP the back and edges thoroughly, as well as the channel in the sword, and wait for it to dry to the proper tacky condition. I actually raised my house temp 10 degrees, to 70, to ensure this would dry quickly. Then quickly and carefully press it fully into the recessed channel, and apply gentle, even pressure to ensure solid contact. Repeat with side two. Then hit the road, because this project ate up a ton of time, and the competition is nigh.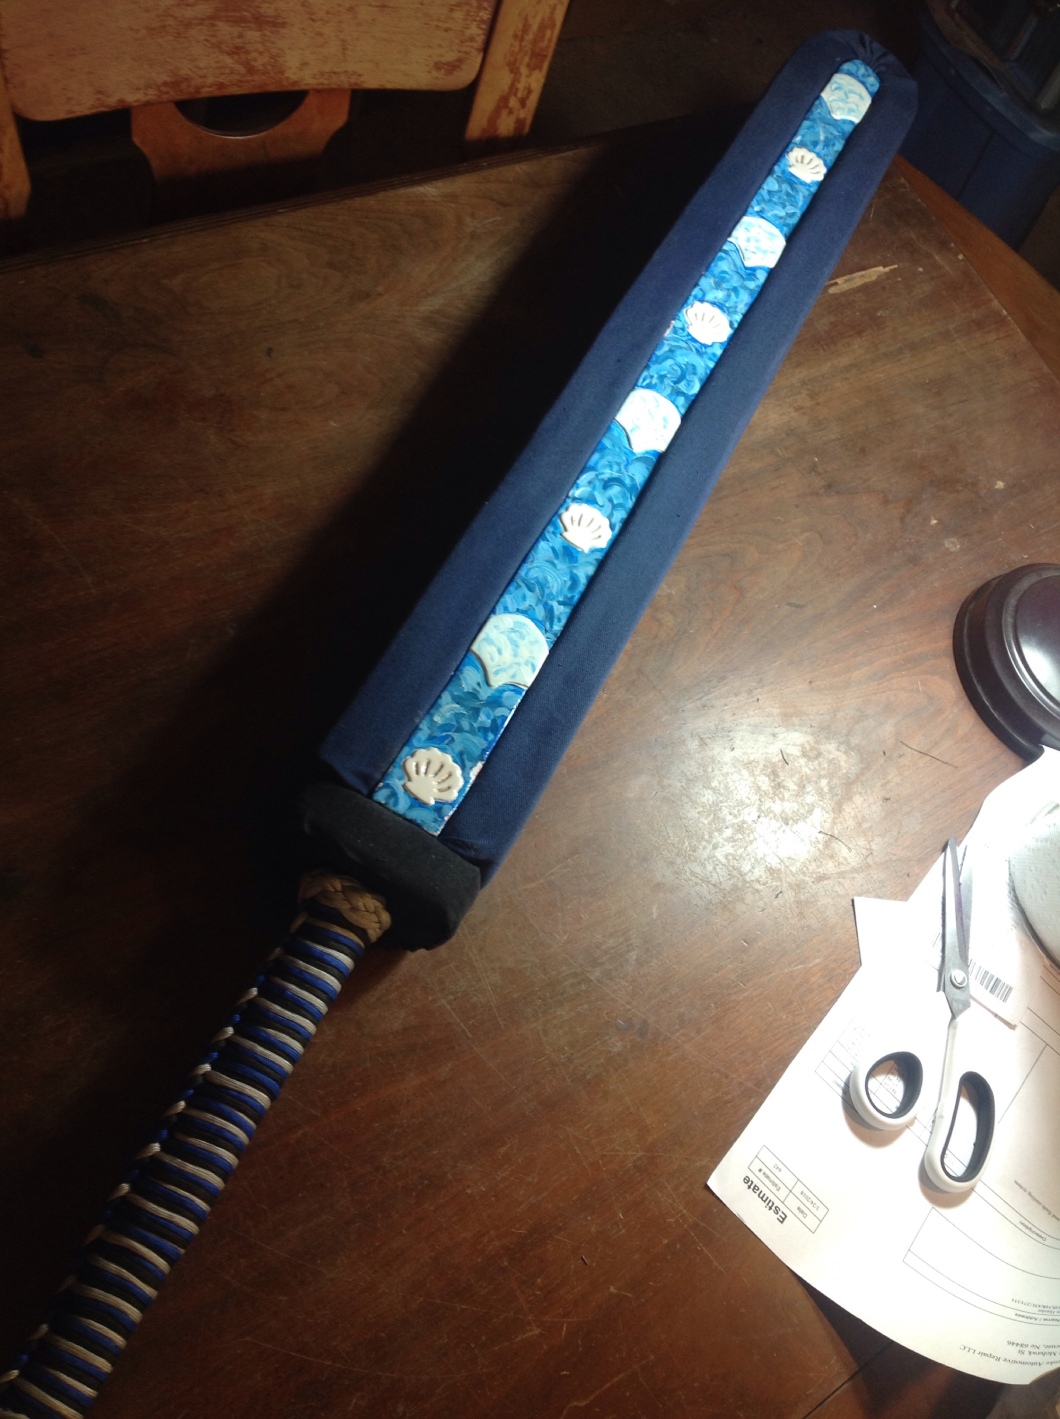
 This is where my biggest mistake came in. The 3 layers of the camp pad striking edges, plus the fabric cover, created a pretty tight fit for the inset. But because I had some of the fabric cover on the bottom of the inset recess, I was worried I wouldn’t get good enough adhesion between my inset & the recess. That’s why I DAPed the vertical edges of the recess and the insets. This was a bad plan. As I tried to insert the plastidipped piece, it stuck part way in, to the DAP on the sides. Pushing down ripped a little of the plastidip and my paint job.
I know better now. I think I need to make a companion dagger, using similar techniques, but neatly trimming the fabric so the bottom of the recess is just foam. (I might even sand the texture off the foam.) Then, when I insert the decorated strip, I will ONLY dap the bottom of the recess and the back of the inset, using tape on the cloth to mask it off. That should allow me to properly insert the decorated strip without the last minute damage I experienced.
The other improvement is to do the painting over the course of a month, rather than a few days, allowing for thinner layers, more dry time, and less opportunity for errors of judgment. Speed kills, y’all.
There are a lot of mistakes in this blade, and places where I could have made better choices. Some of those better choices I realized after the fact, and others I knew before starting. Lots of recommendations and videos show ample use of power tools to shape the foam. (Especially removing the texture on puzzle mat.) That really wasn’t an option for me. I’m not sure that people looking at my work would be able to see all the goofs, without this blog post laying it all out. But teaching and learning is what I’m all about so here it is, warts and all.
I’m really proud of this blade, even with the flaws. This is my very first foam-smithed item. I’d never purchased DAP, or Plastidip before. I didn’t even use acrylics on a regular basis. (I’m an ink and gouache girl.) People kept asking if they could use it to fight with. It feels good in the hand. It CAN be swung one-handed, but has space for two hands. One test swing yesterday, that moved the receiver slightly, got the comment, “That was the nicest hit from a flat blade sword I think I’ve ever gotten.”
The rules I’m working from:
Strike legal at least 1 inch of foam over the core, covered in durable opaque cloth. Non-striking padded surfaces within 1/2 of strike surfaces must be cloth covered. one Cross section at least 2.5 inches.
Courtesy padding is 1/2″ over the core on non-striking side of blade.
At least 2/3rds of its length must be padded.

[…] Flat blade sword – Score 3.81667 – Fifth place in category […]
LikeLike
[…] Flat blade sword – “Clash of the Waves” […]
LikeLike